NASA Micro-g NExT
Micro-g NExT is a design challenge for space exploration tools that culminates in a test session at the NASA Johnson Space Center Neutral Buoyancy Laboratory, a 40 foot deep pool used to simulate the microgravity environment.
Contents
- The Team
- Objective
- Process
- Challenges
- Conclusions
- Miscellaneous thoughts that didn’t fit into any of the above
The Team
My role: Lead engineer* and de facto team lead
- Kyle Johnson
- Aditya Gorla
- Ariel Lavi
- Jose Cebreros
Our faculty advisor was Dr. Edward Young.
In addition to our faculty advisor, many other students and professors helped lead us in the right direction as we developed our design.
 Source: Allison Bills, NASA JSC Education. From left to right: a nice UCLA alum we met at the event, two members of the UCLA surface sampling team, myself, Ariel, Kyle. Due to US citizenship, neither of the UCLA teams were able to have all of their members at the event.
*I have no business calling myself an engineer until I get my PE. It’s a protected title in California, and I haven’t had training yet—heck, at this point, I don’t even have my degree! For organizational purposes, though, I guess this is my title, since I took care of most of the technical aspects of the project.
Objective
This was one of Bruin Space’s first projects! I literally showed up to the club’s first meeting, not even knowing whether I wanted to join Bruin Space—and got thrown in with my team. None of us knew each other before this project, and we were mostly freshmen, so it was quite the adventure!
We were tasked with creating a handheld, subsurface sampling device powered (if we so chose) pneumatically. This meant that it had to fit within a 8”x8”x18” volume, and obtain samples from a sand/silt/rock mixture meant to represent regolith, as well as from solid sandstone.
Process
Throughout fall quarter of 2016, we worked on our proposal, built the actual device during winter and spring of 2017, and got to test it at the NBL in May of 2017.
Proposal
This was my first time writing a proposal for a technical project (and if I go into academia, it certainly won’t be my last!) I really enjoyed the “hand-wavy” nature of the proposal—like CAD, or anything that takes place digitally, we had the freedom (within reason) to say our device could accomplish some task, or used such and such COTS part (that might not exist exactly to our specifications).
As a side note, it just so happened that the scholarship application for HSSEAS was due on the same day as our proposal. Being the short sighted student I was at the time, and having invested hours researching existing solutions, making CAD models and drawings, getting concept feedback from mentors, and doing preliminary calculations, the choice was clear: NASA won.
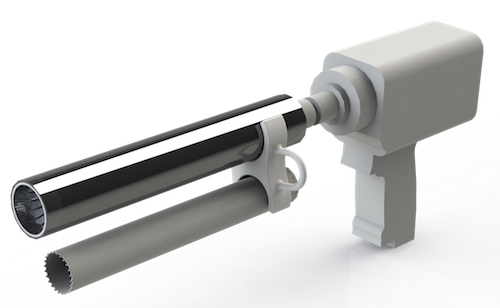
The design proposed was essentially an eggbeater with a plunger mechanism and corkscrew attached at the end to anchor the whole assembly in place. The gearbox transfers the rotation of the handle to the rotation of the sample tube, which in turn causes the sample tube to move along a lead screw, allowing the sample to enter and water to be displaced.
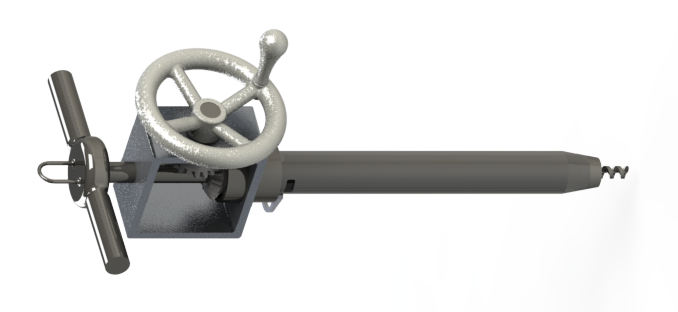
A rendering of the proposed design.
Thanks to its t-shaped, sword-like profile, as well as the fact that it was designed to penetrate rock, we went with a non-technical name for the device: “Excalibur”. (Quick, someone come up with a backronym!)
The operation was to occur in four phases, as follows (excerpt from our proposal):
Anchoring - After the anchor is lined up normal to the sample bed surface, the t-shaped handle is used to push the device until the chamfer of the sample tube touches the surface.
Sampling - The handle is used to keep the device vertical and apply a downward force while a torque is applied to the crank in order to ease the sample tube into the sample bed. This drilling process can be easily adapted for use with a pneumatic motor. When the maximum depth is reached, the handle and gearbox may be released via the socket.
Removal - An upward force is applied to the crank of the sample tube in order to remove the sample tube from the sample bed. The sample may be immediately capped to prevent sediment loss.
Reloading - An empty sample tube is connected to the outer handle via the socket. The piston is then pushed down, and the device is ready for use.
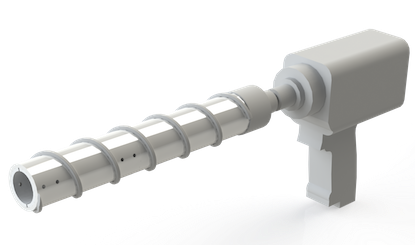
Design
After doing some more research on existing subsurface sampling methods in glacial research and the mining industry, as well as talking to our faculty advisor (of course, almost being laughed out of his office for drilling into sandstone by hand) and some other folks that actually knew what they were doing, our design changed drastically.
Here’s some CAD models of our designs, all lovingly designed and rendered in Solidworks:
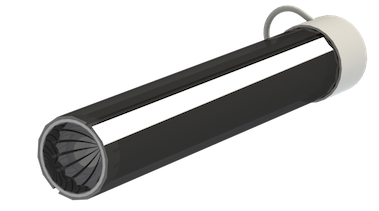
Helix for debris displacement (no idea how to manufacture that one!)
Core catcher assembly for sand. The core catcher is COTS and used for soil sampling. It’s shaped like an orange peel.
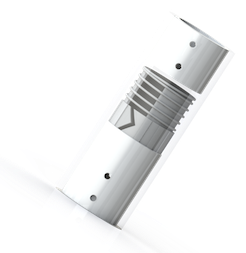
Core catcher assembly for solid sandstone. Similar to the sand sampling tube, the core catcher allows the sample to go in, but not come out—any force along the tube outward causes the 3D printed spring to constrict and hold the sample in place. At the last minute, we decided to grossly simplify our design for the sandstone and throw out the core catcher entirely, since testing showed that the sample was sufficiently well retained.
All together, now! Here’s the detachable sample tubes, connected by 3D printed components.
Testing
Our test setup: sand, water, and orange buckets from Home Depot, along with some chunks of sandstone we got for the cheap from a local landscaping company.
We did the bare minimum for this part—verifying whether the hole saw attachment could drill through our sandstone samples safely, and also whether we were able to obtain sand using our PVC tube (yes, to both).

Obtaining sand using a PVC tube.
Outreach
Along with the rest of Bruin Space, we attended Exploring Your Universe! We ran an activity for elementary- and middle- aged students to gain intuition about buoyancy—the classic “pennies in a boat” activity. Given a sheet of aluminum foil, participants were tasked with creating a boat to support as many pennies as possible. In addition to a tub of tap water, we also had a tub of saltwater to demonstrate the effect of fluid density on buoyant force.
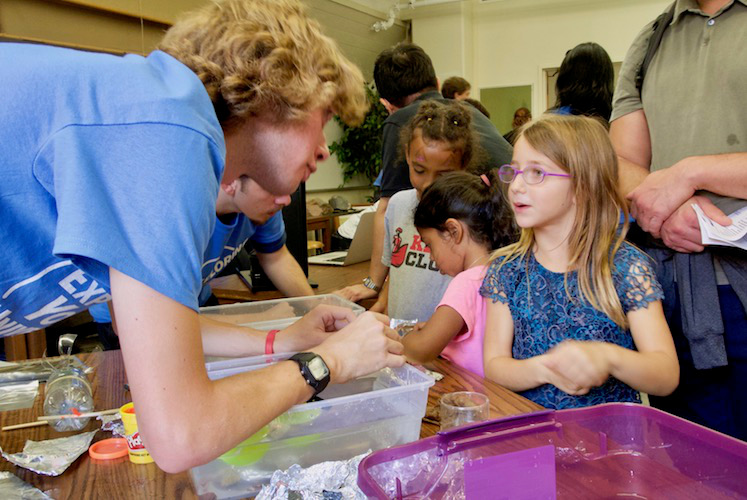
Here’s Kyle demonstrating the activity to one of our visitors!
The activity was fairly popular—maybe it was the snickers we gave out for completing it, but there was a steady flow of kids excited to build boats, learn about buoyancy, and splash around!
NBL
Does it look good (and is it safe!) on paper?
The most nerve wracking part of our time at the NBL wasn’t the actual test, but the Test Readiness Review (TRR). Basically, we went up with our tool and our slides, and talked about our device to NBL engineers and divers that verified that it was safe to operate in the underwater environment, in close proximity to people. They really picked apart every aspect, grilling us on safety and concerns of 3D printed parts floating away in particular. One of the questions that I didn’t anticipate was about the COTS impact driver: “What’s the minimum pressure it can handle, and still be effective?” Had the drill been too loud to operate at full power, we should have been able to quantify the extent to which the drill’s power could be reduced, and compare that to the maximum threshold for noise.
Does it actually work in real life?
Ehh, kind of. We were able to anticipate one of the failures for sand sampling due to our open-tube mechanism: while it was able to capture the full sample, it wasn’t able to fully retain it. Holes were drilled at the top of the tube for allowing water to escape as it was displaced by incoming sand, but the fine sand was able to escape as well. Had we utilized a plunger mechanism (as described in our proposal) that isolated the sample chamber from the water displacement, we may have been more successful.
The other failure was due to a design flaw that I will hopefully never make again: aluminum on HSS (duh!). Basically, because our sample tube used an aluminum coupler with female threads to fit over a steel hole saw mandrel, as the tool drilled into sandstone, facing resistance, the softer threads gave way. We were able to capture a small sample, though!
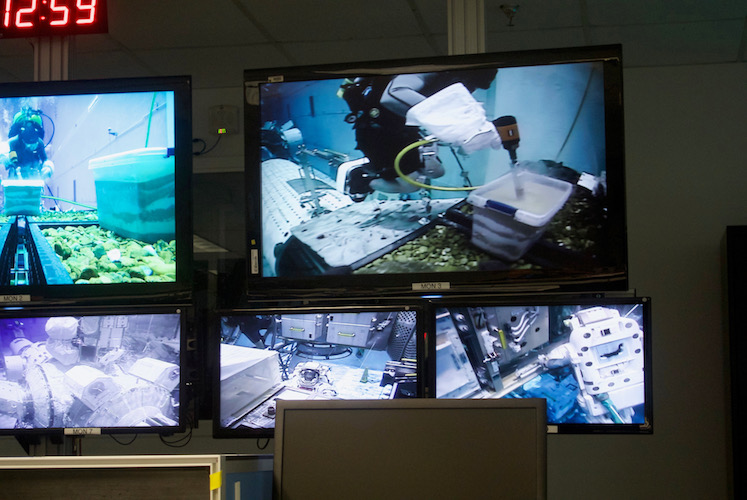
Our view of the divers operating the mechanism to obtain a sandstone sample.
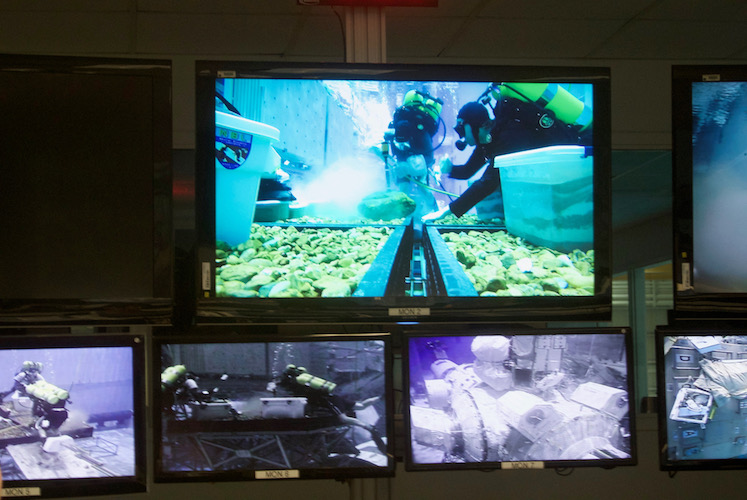 Our view of the divers operating the mechanism to obtain a sand sample.
 Source: Allison Bills, NASA JSC Education. Ariel and Kyle, calling the shots. We briefed the divers beforehand, but during the test, we had to be constantly communicating with the divers, formally requesting each operation and asking questions about the ease and effectiveness of the device. Imagine the delay, trying to do this with astronauts on Mars!
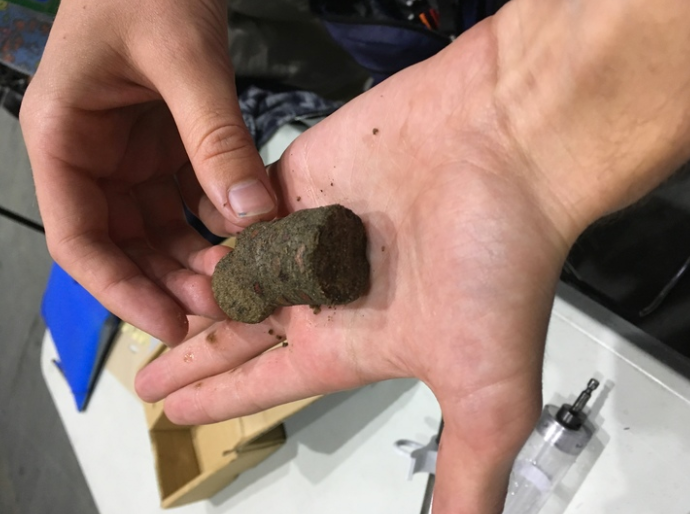
The approx. 2” sandstone sample we obtained, 25% of the objective! None of the other subsurface teams were able to accomplish the objective completely, but were all able to at least obtain a similarly sized chunk of sandstone.
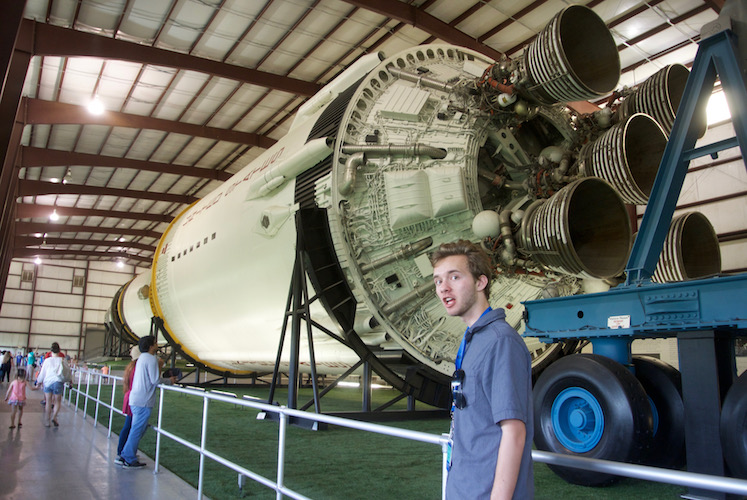
Space Center Houston! There’s tons of graphics comparing the size of the Saturn V against monuments and buildings, but it’s absolutely magnificent to see in person.
Challenges
What we did well
Really coming together at the end. The day most of our team flew out, there was still machining left to do. So, we organized a list of all the parts on our tool with their respective locations (i.e., travelling to Houston, or still waiting to be assembled at UCLA), pulled in all the resources we could—like the project manager for Sandbox, a stranger with a 3D printer from 3D Hubs, and most critically, a local, cranky, welder.
Keep it simple, stupid! More parts means more things to break.
What we did poorly
Throughout the process, we undoubtedly experienced difficulties dealing with each other. People didn’t show up on time to meetings. People didn’t do their share. People had real, pressing obligations come up. Managing all of those setbacks was difficult, as we didn’t always understand each other’s priorities. For instance, because we were going to NASA (of all places!) I was occasionally willing to stay up longer, or study a tad less, in order to get something done. However, some of my teammates may not have thought the same way, and we didn’t communicate with each other.
I was (unfortunately?) the most experienced member on my team, due to my background in high school robotics. As a result, I was often the one taking ownership, even when I wasn’t able to fully comprehend the magnitude of our task and anticipate complications. Also, I didn’t always properly ensure that every member of my team fully understood the technical aspects of the project, which could have been detrimental to our performance in the TRR. In addition, I had a lack of advanced manufacturing expertise, (the Al/HSS is completely unexcusable though!) and I naively assumed that whatever I couldn’t manufacture, I could find online… somewhere.
Representing UCLA well. Had we worked smarter/harder, and created a better device that we could take more pride in, we would have better represented Bruin Space, UCLA, and UCLA Engineering—this might just be my own mentality of our attempt not being “enough”, though, since there’s a lot we accomplished that we can be proud of.
What we (or other Micro-g teams) can do differently
Whatever you do, please take Hofstader’s law into account: “It always takes longer than you expect, even when you take into account Hofstadter’s Law.” Like any other project, our team was too optimistic about deadlines.
Testing!!! Test, test, and test again, asking for guidance on how to replicate the conditions of the NBL as accurately as possible (i.e., full submersion). Don’t just test for function—test to failure, if possible!
Relax. By the time you’ve made it to the NBL, 95% of the work is done—please don’t stress yourself out over your device, and have fun learning from the divers and engineers at the NBL, plus all the cool perks like touring JSC. Being perpetually high strung and stressed out during test week did no favors for my interactions with my teammates, and didn’t improve our device performance at all.
Conclusions
There are so many wonderful people at Johnson Space Center that wanted us and the other teams to be successful. Even though we often tripped up professionally, technically, and socially due to our lack of experience, we were always helped along by the mentors at the NBL, from last minute fixes, to zipties, to tools that we didn’t have on hand.
Miscellaneous thoughts that didn’t fit into any of the above
During my week of 48 hour sleep cycles, I developed a strange habit (perhaps mild addiction?) with McMaster. Most nights, at 4 am, I would go on the McMaster website, order something relevant to our project, and forget about it. Then, I would get a package notification from Housing a day or two later—a surprise, from past, sleep-deprived me!
While I was touring Johson Space Center with my cohort, I heard another (white, male) student say, “if I was wearing my glasses, I would totally look like one of the engineers here!” That statement really stuck with me, even though for him, it was probably meant to be a joke—if I had shown up with glasses, I wouldn’t have looked any more like the mostly white, male cadre at JSC. I don’t identify strongly with organizations meant for promoting diversity in tech like SWE since I have the privilege of working and learning in an open and gender-neutral environment, but this reminded me that promoting diversity in the STEM fields is still an ongoing challenge. It’s kind of like the goals of the #ILookLikeAnEngineer campaign!